使用 Kafka 和 InfluxDB 构建数据流管道
作者:Jessica Wachtel / 产品, 开发者
2023 年 9 月 28 日
导航至
InfluxDB 和 Kafka 不是竞争对手,而是互补的。流数据,更具体地说是 时间序列数据,以高容量和高速度传输。将 InfluxDB 添加到您的 Kafka 集群,可以为您的时间序列数据提供专门的处理。这种专门的处理包括实时查询和分析,以及与尖端的机器学习和人工智能技术的集成。像 Hulu 这样的公司将他们的 InfluxDB 实例与 Kafka 配对使用。在数据源和 InfluxDB 之间实施 Kafka 集群可以提供额外的冗余层,并更好地控制数据的输入和输出。
您只需要几行 TOML 代码即可将数据从 Kafka 发送到 InfluxDB。Telegraf 是一个基于插件的开源工具,只需几行易于理解的代码即可将您的 Kafka 主题连接到 InfluxDB。以下教程包含如何将数据发送到 Kafka 主题、通过 Telegraf 连接到该主题以及将数据发送到 InfluxDB Cloud Serverless 的完整演练。示例数据集模拟花园传感器数据。Python 代码生成模拟传感器数据的示例数据,并将其发送到 Kafka 主题。
Aykut Bulgu 是 此项目的原始创建者,该项目后来针对 InfluxDB Cloud Serverless 进行了修改。如果您希望直接从 GitHub 拉取此代码文件,可以在此处找到它。
先决条件
构建代码文件
此代码文件非常容易上手。构建将分阶段进行。首先,我们将构建应用程序部分,其中包括数据生成函数、Dockerfile 和说明。接下来,我们将添加配置文件。最后,我们将代码文件连接到 InfluxDB Cloud Serverless。
创建应用程序
创建一个名为“app”的文件夹。
以下文件都属于 app 文件夹内。
app/garden_sensor_gateway.py
此文件包含数据生成函数。发送到 InfluxDB 的此数据集包括花园的监控详细信息。该函数为温度、湿度、风速和土壤创建随机整数。然后,该函数将数据转换为 JSON 格式。
此文件初始化 Kafka 类并连接到 Kafka 主机,以将消息发送到 Kafka 主题“garden_sensor_data”。
import time
import json
import random

from kafka import KafkaProducer

def random_temp_cels():
    return round(random.uniform(-10, 50), 1)

def random_humidity():
    return round(random.uniform(0, 100), 1)

def random_wind():
    ret
    data["temperature"] = random_temp_cels()
    data["humidity"] = random_humidity()
    data["wind"] = random_windurn round(random.uniform(0, 10), 1)

def random_soil():
    return round(random.uniform(0, 100), 1)

def get_json_data():
    data = {}
()
    data["soil"] = random_soil()

    return json.dumps(data)

def main():
    producer = KafkaProducer(bootstrap_servers=['kafka:9092'])

    for _ in range(20000):
        json_data = get_json_data()
        producer.send('garden_sensor_data', bytes(f'{json_data}','UTF-8'))
        print(f"Sensor data is sent: {json_data}")
        time.sleep(5)

if __name__ == "__main__":
    main()
app/Dockerfile
此文件包含将“garden_sensor_gateway.py”转换为容器所需的说明。
FROM python:3.11

WORKDIR /app

COPY requirements.txt .
RUN pip install --no-cache-dir -r requirements.txt

COPY . .

CMD ["python", "garden_sensor_gateway.py"]
app/requirements.txt
此文件包含 kafka-python 库。
kafka-pythonresources
创建一个名为“resources”的新文件夹。它不在 app 文件夹内。
以下文件属于 resources 文件夹内。
resources/docker-compose.yaml
docker-compose.yaml 包含构建 kafka、zookeeper、python garden_sensor_gateway 和 telegraf 容器所需的所有信息。
version: '3.3'

services:
  kafka:
    container_name: kafka
    image: quay.io/strimzi/kafka:0.28.0-kafka-3.1.0
    command: [
      "sh", "-c",
      "bin/kafka-server-start.sh config/server.properties --override listeners=$${KAFKA_LISTENERS} --override advertised.listeners=$${KAFKA_ADVERTISED_LISTENERS} --override zookeeper.connect=$${KAFKA_ZOOKEEPER_CONNECT}"
    ]
    depends_on:
    - zookeeper
    ports:
    - "9092:9092"
    environment:
      LOG_DIR: "/tmp/logs"
      KAFKA_ADVERTISED_LISTENERS: PLAINTEXT://kafka:9092
      KAFKA_LISTENERS: PLAINTEXT://0.0.0.0:9092
      KAFKA_ZOOKEEPER_CONNECT: zookeeper:2181
    healthcheck:
      test: ["CMD", "nc", "-z", "kafka", "9092"]
      interval: 30s
      timeout: 10s
      retries: 5

  zookeeper:
    container_name: zookeeper
    image: quay.io/strimzi/kafka:0.28.0-kafka-3.1.0
    command: [
        "sh", "-c",
        "bin/zookeeper-server-start.sh config/zookeeper.properties"
      ]
    ports:
    - "2181:2181"
    environment:
      LOG_DIR: /tmp/logs

  garden_sensor_gateway:
    container_name: garden_sensor_gateway
    image: garden_sensor_gateway
    build: ../app
    # networks:
    #  - my_network
    # command: ["tail", "-f", "/dev/null"]
    depends_on:
      kafka:
       condition: service_healthy

  telegraf:
    container_name: telegraf
    image: telegraf:latest
    command: ["telegraf", "--debug", "--config", "/etc/telegraf/telegraf.conf"]
    volumes:
      - ./mytelegraf.conf:/etc/telegraf/telegraf.conf
    depends_on:
      kafka:
       condition: service_healthy
Telegraf 命令并非特定于此示例。与此项目的大部分内容一样,您可以将此容器配置用于其他项目。第一个命令是 “telegraf” 命令。“—debug” 标志在终端中提供代理的工作详细信息。然后,必须在配置 "/etc/telegraf/telegraf.conf” 之前包含 “—config” 标志。
resources/mytelegraf.conf
mytelegraf.conf 是 Telegraf 配置 TOML 文件。Telegraf 设置并非像其他文件那样提供复制/粘贴解决方案,而是直接来自您的 InfluxDB Cloud Serverless 账户。
让我们跳转到我们的 InfluxDB Cloud Serverless 账户。登录 InfluxDB Cloud Serverless 后,第一步是设置存储桶。将存储桶视为数据库内的数据库。Telegraf 将从 Kafka 主题读取数据并将其发送到 InfluxDB Cloud Serverless 内的指定存储桶。
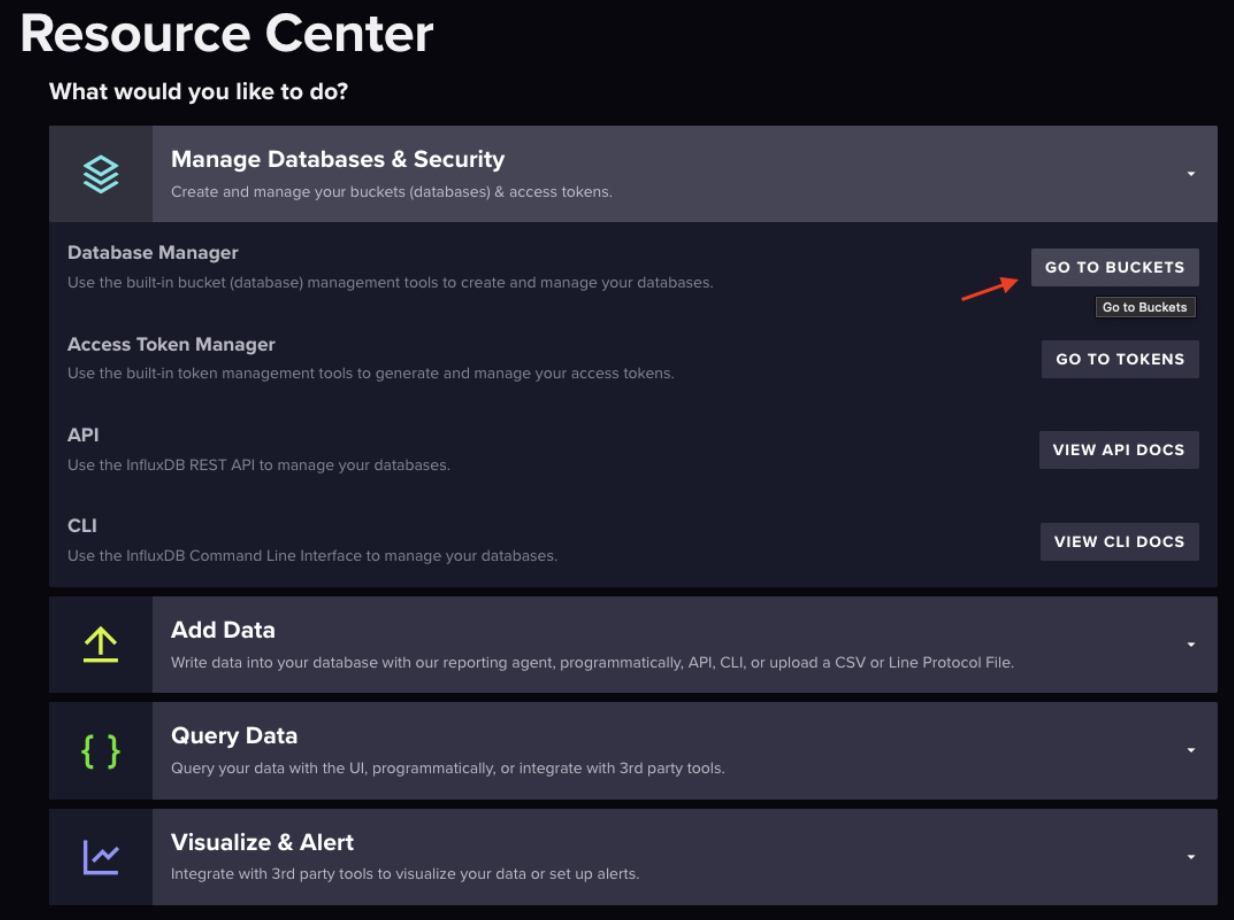
在资源中心选择“管理数据库和安全”,或将鼠标悬停在页面左侧图标菜单中向上箭头的图标上。

页面右侧蓝色的“创建存储桶”按钮是您可以在其中创建存储桶的位置。在弹出窗口中创建您的存储桶。

弹出窗口关闭后,“Telegraf”将出现在“加载数据”标题下突出显示的“存储桶”旁边。选择“Telegraf”。这将开始 mytelegraf.conf 设置。
第 1 部分:InfluxDB 输出插件
在页面中间/右侧,您将看到“InfluxDB 输出插件”。这就是 mytelegraf.conf 连接到 InfluxDB Cloud Serverless 的方式。复制到剪贴板,您可以将整个文件添加到 mytelegraf.conf 中。
下一步是创建令牌。在本教程中,我们将创建一个所有访问权限 API 令牌。“Telegraf”标题旁边是“API 令牌”标题。生成 API 令牌。您可以创建环境变量或粘贴到令牌字符串中(这不是最安全的做法)。
urls 将您连接到您的 InfluxDB Cloud Serverless 账户。organization 是组织的名称。这是随账户一起设置的。bucket 是您要将数据发送到的存储桶。
第 2 部分:输入
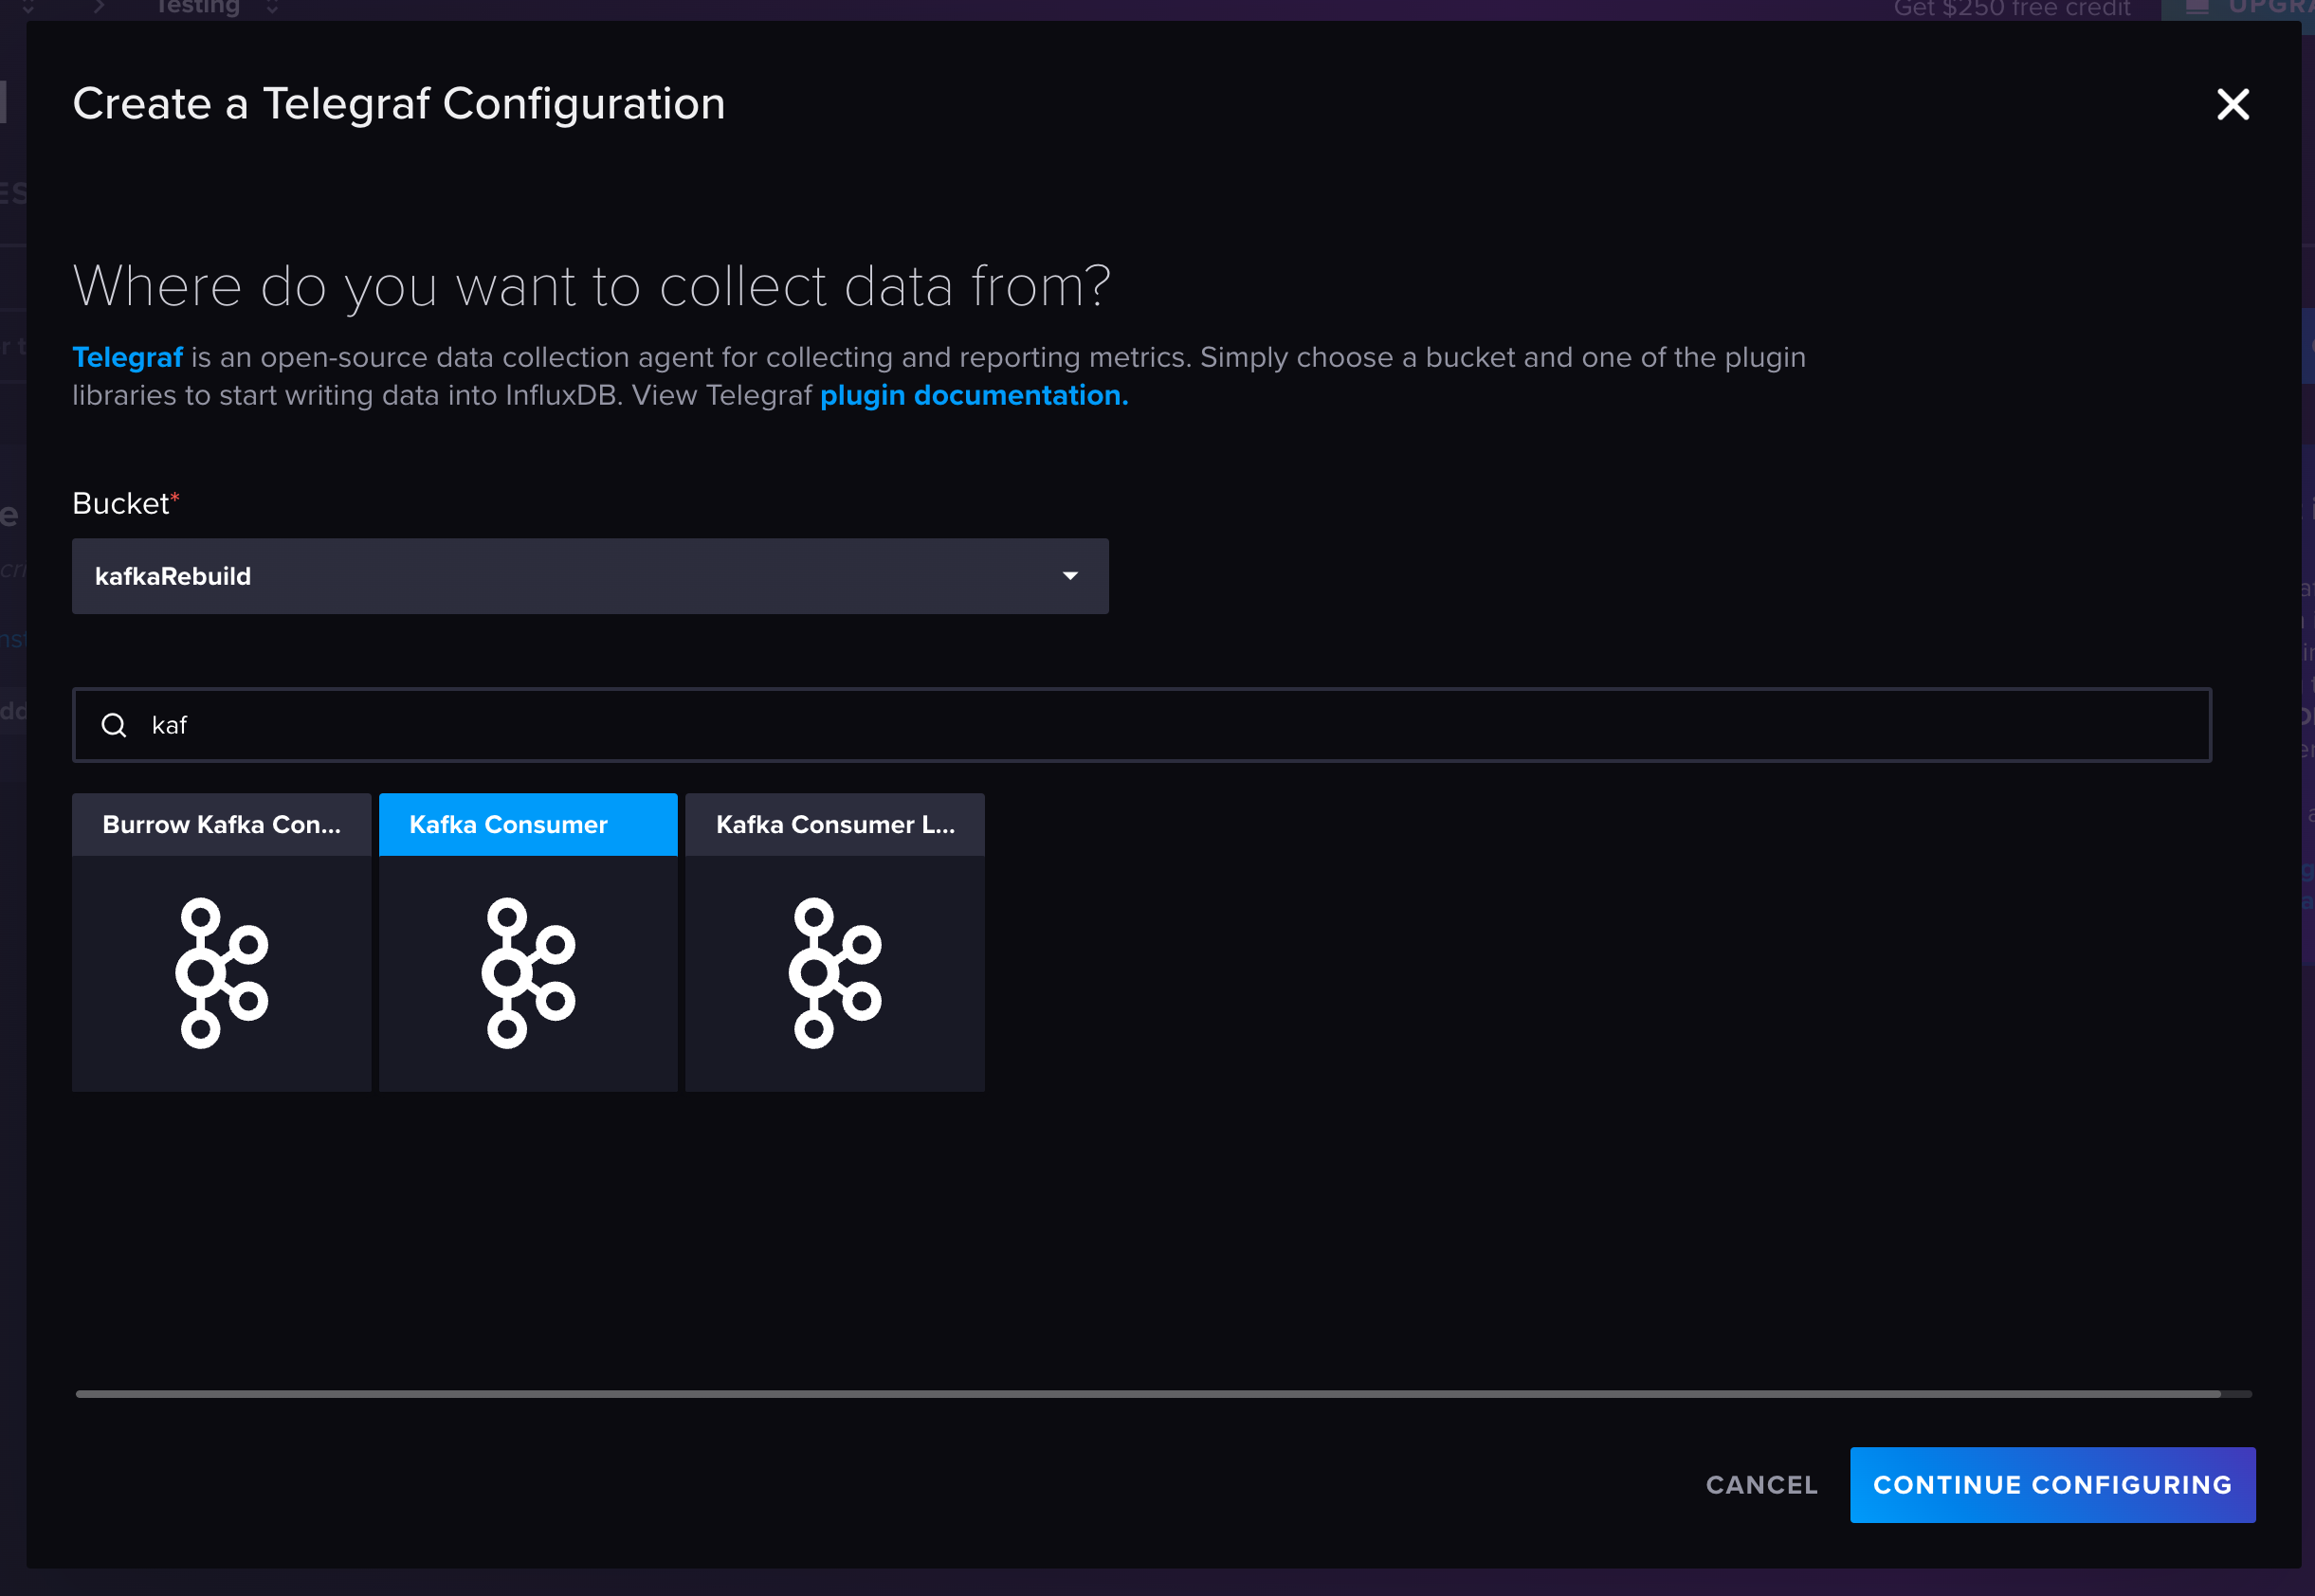
返回到您的 InfluxDB Cloud Serverless 账户中的“Telegraf”。选择蓝色的“创建配置”按钮。在存储桶下拉菜单中选择您的存储桶。我们正在寻找的数据源选项是“Kafka Consumer”。我们不是在创建配置,而是在复制代码并将其粘贴到 mytelegraf.conf 文件中。

代码需要进行一些修改。brokers 行必须与 python 函数发送数据的 broker 匹配。在这种情况下,localhost:9092 需要更改为 kafka:9092。
接下来,调整主题以匹配代码文件中的 Kafka 主题。最后,代码的最后一行是 data_format = “influx”。这意味着 InfluxDB 期望行协议。但是,python 函数以 JSON 格式发送数据。此处的解决方法是将 data_format = “json” 更改为 data_format = “json”。
最终的 mytelegraf.conf 文件将与此非常相似
[[outputs.influxdb_v2]]
  ## The URLs of the InfluxDB cluster nodes.
  ##
  ## Multiple URLs can be specified for a single cluster, only ONE of the
  ## urls will be written to each interval.
  ##   ex: urls = ["https://us-west-2-1.aws.cloud2.influxdata.com"]
  urls = ["https://your-cloud-url"]

  ## API token for authentication.
  token = "token here"

  ## Organization is the name of the organization you wish to write to; must exist.
  organization = "Testing"

  ## Destination bucket to write into.
  bucket = "kafkaRebuild"

# Read metrics from Kafka topics
[[inputs.kafka_consumer]]
  ## Kafka brokers.
  brokers = ["kafka:9092"]

  ## Topics to consume.
  topics = ["garden_sensor_data"]

  ## When set this tag will be added to all metrics with the topic as the value.
  # topic_tag = ""

  ## Optional Client id
  # client_id = "Telegraf"

  ## Set the minimal supported Kafka version.  Setting this enables the use of new
  ## Kafka features and APIs.  Must be 0.10.2.0 or greater.
  ##   ex: version = "1.1.0"
  # version = ""

  ## Optional TLS Config
  # tls_ca = "/etc/telegraf/ca.pem"
  # tls_cert = "/etc/telegraf/cert.pem"
  # tls_key = "/etc/telegraf/key.pem"
  ## Use TLS but skip chain & host verification
  # insecure_skip_verify = false

  ## SASL authentication credentials.  These settings should typically be used
  ## with TLS encryption enabled
  # sasl_username = "kafka"
  # sasl_password = "secret"

  ## Optional SASL:
  ## one of: OAUTHBEARER, PLAIN, SCRAM-SHA-256, SCRAM-SHA-512, GSSAPI
  ## (defaults to PLAIN)
  # sasl_mechanism = ""

  ## used if sasl_mechanism is GSSAPI (experimental)
  # sasl_gssapi_service_name = ""
  # ## One of: KRB5_USER_AUTH and KRB5_KEYTAB_AUTH
  # sasl_gssapi_auth_type = "KRB5_USER_AUTH"
  # sasl_gssapi_kerberos_config_path = "/"
  # sasl_gssapi_realm = "realm"
  # sasl_gssapi_key_tab_path = ""
  # sasl_gssapi_disable_pafxfast = false

  ## used if sasl_mechanism is OAUTHBEARER (experimental)
  # sasl_access_token = ""

  ## SASL protocol version.  When connecting to Azure EventHub set to 0.
  # sasl_version = 1

  # Disable Kafka metadata full fetch
  # metadata_full = false

  ## Name of the consumer group.
  # consumer_group = "telegraf_metrics_consumers"

  ## Compression codec represents the various compression codecs recognized by
  ## Kafka in messages.
  ##  0 : None
  ##  1 : Gzip
  ##  2 : Snappy
  ##  3 : LZ4
  ##  4 : ZSTD
  # compression_codec = 0
  ## Initial offset position; one of "oldest" or "newest".
  # offset = "oldest"

  ## Consumer group partition assignment strategy; one of "range", "roundrobin" or "sticky".
  # balance_strategy = "range"

  ## Maximum length of a message to consume, in bytes (default 0/unlimited);
  ## larger messages are dropped
  max_message_len = 1000000

  ## Maximum messages to read from the broker that have not been written by an
  ## output.  For best throughput set based on the number of metrics within
  ## each message and the size of the output's metric_batch_size.
  ##
  ## For example, if each message from the queue contains 10 metrics and the
  ## output metric_batch_size is 1000, setting this to 100 will ensure that a
  ## full batch is collected and the write is triggered immediately without
  ## waiting until the next flush_interval.
  # max_undelivered_messages = 1000

  ## Maximum amount of time the consumer should take to process messages. If
  ## the debug log prints messages from sarama about 'abandoning subscription
  ## to [topic] because consuming was taking too long', increase this value to
  ## longer than the time taken by the output plugin(s).
  ##
  ## Note that the effective timeout could be between 'max_processing_time' and
  ## '2 * max_processing_time'.
  # max_processing_time = "100ms"

  ## Data format to consume.
  ## Each data format has its own unique set of configuration options, read
  ## more about them here:
  ## https://github.com/influxdata/telegraf/blob/master/docs/DATA_FORMATS_INPUT.md
  data_format = "json"
将数据写入 InfluxDB Cloud Serverless
代码文件的最后一步是启动容器并将数据写入 InfluxDB Cloud Serverless。在新终端窗口中,cd 进入 resources 文件夹并运行命令 docker compose up --build。容器彼此依赖,因此请等待几分钟再检查数据。
如果 Telegraf 正在正确地读取数据并将其写入 InfluxDB Cloud Serverless,则会在终端内显示以下消息。

查询数据
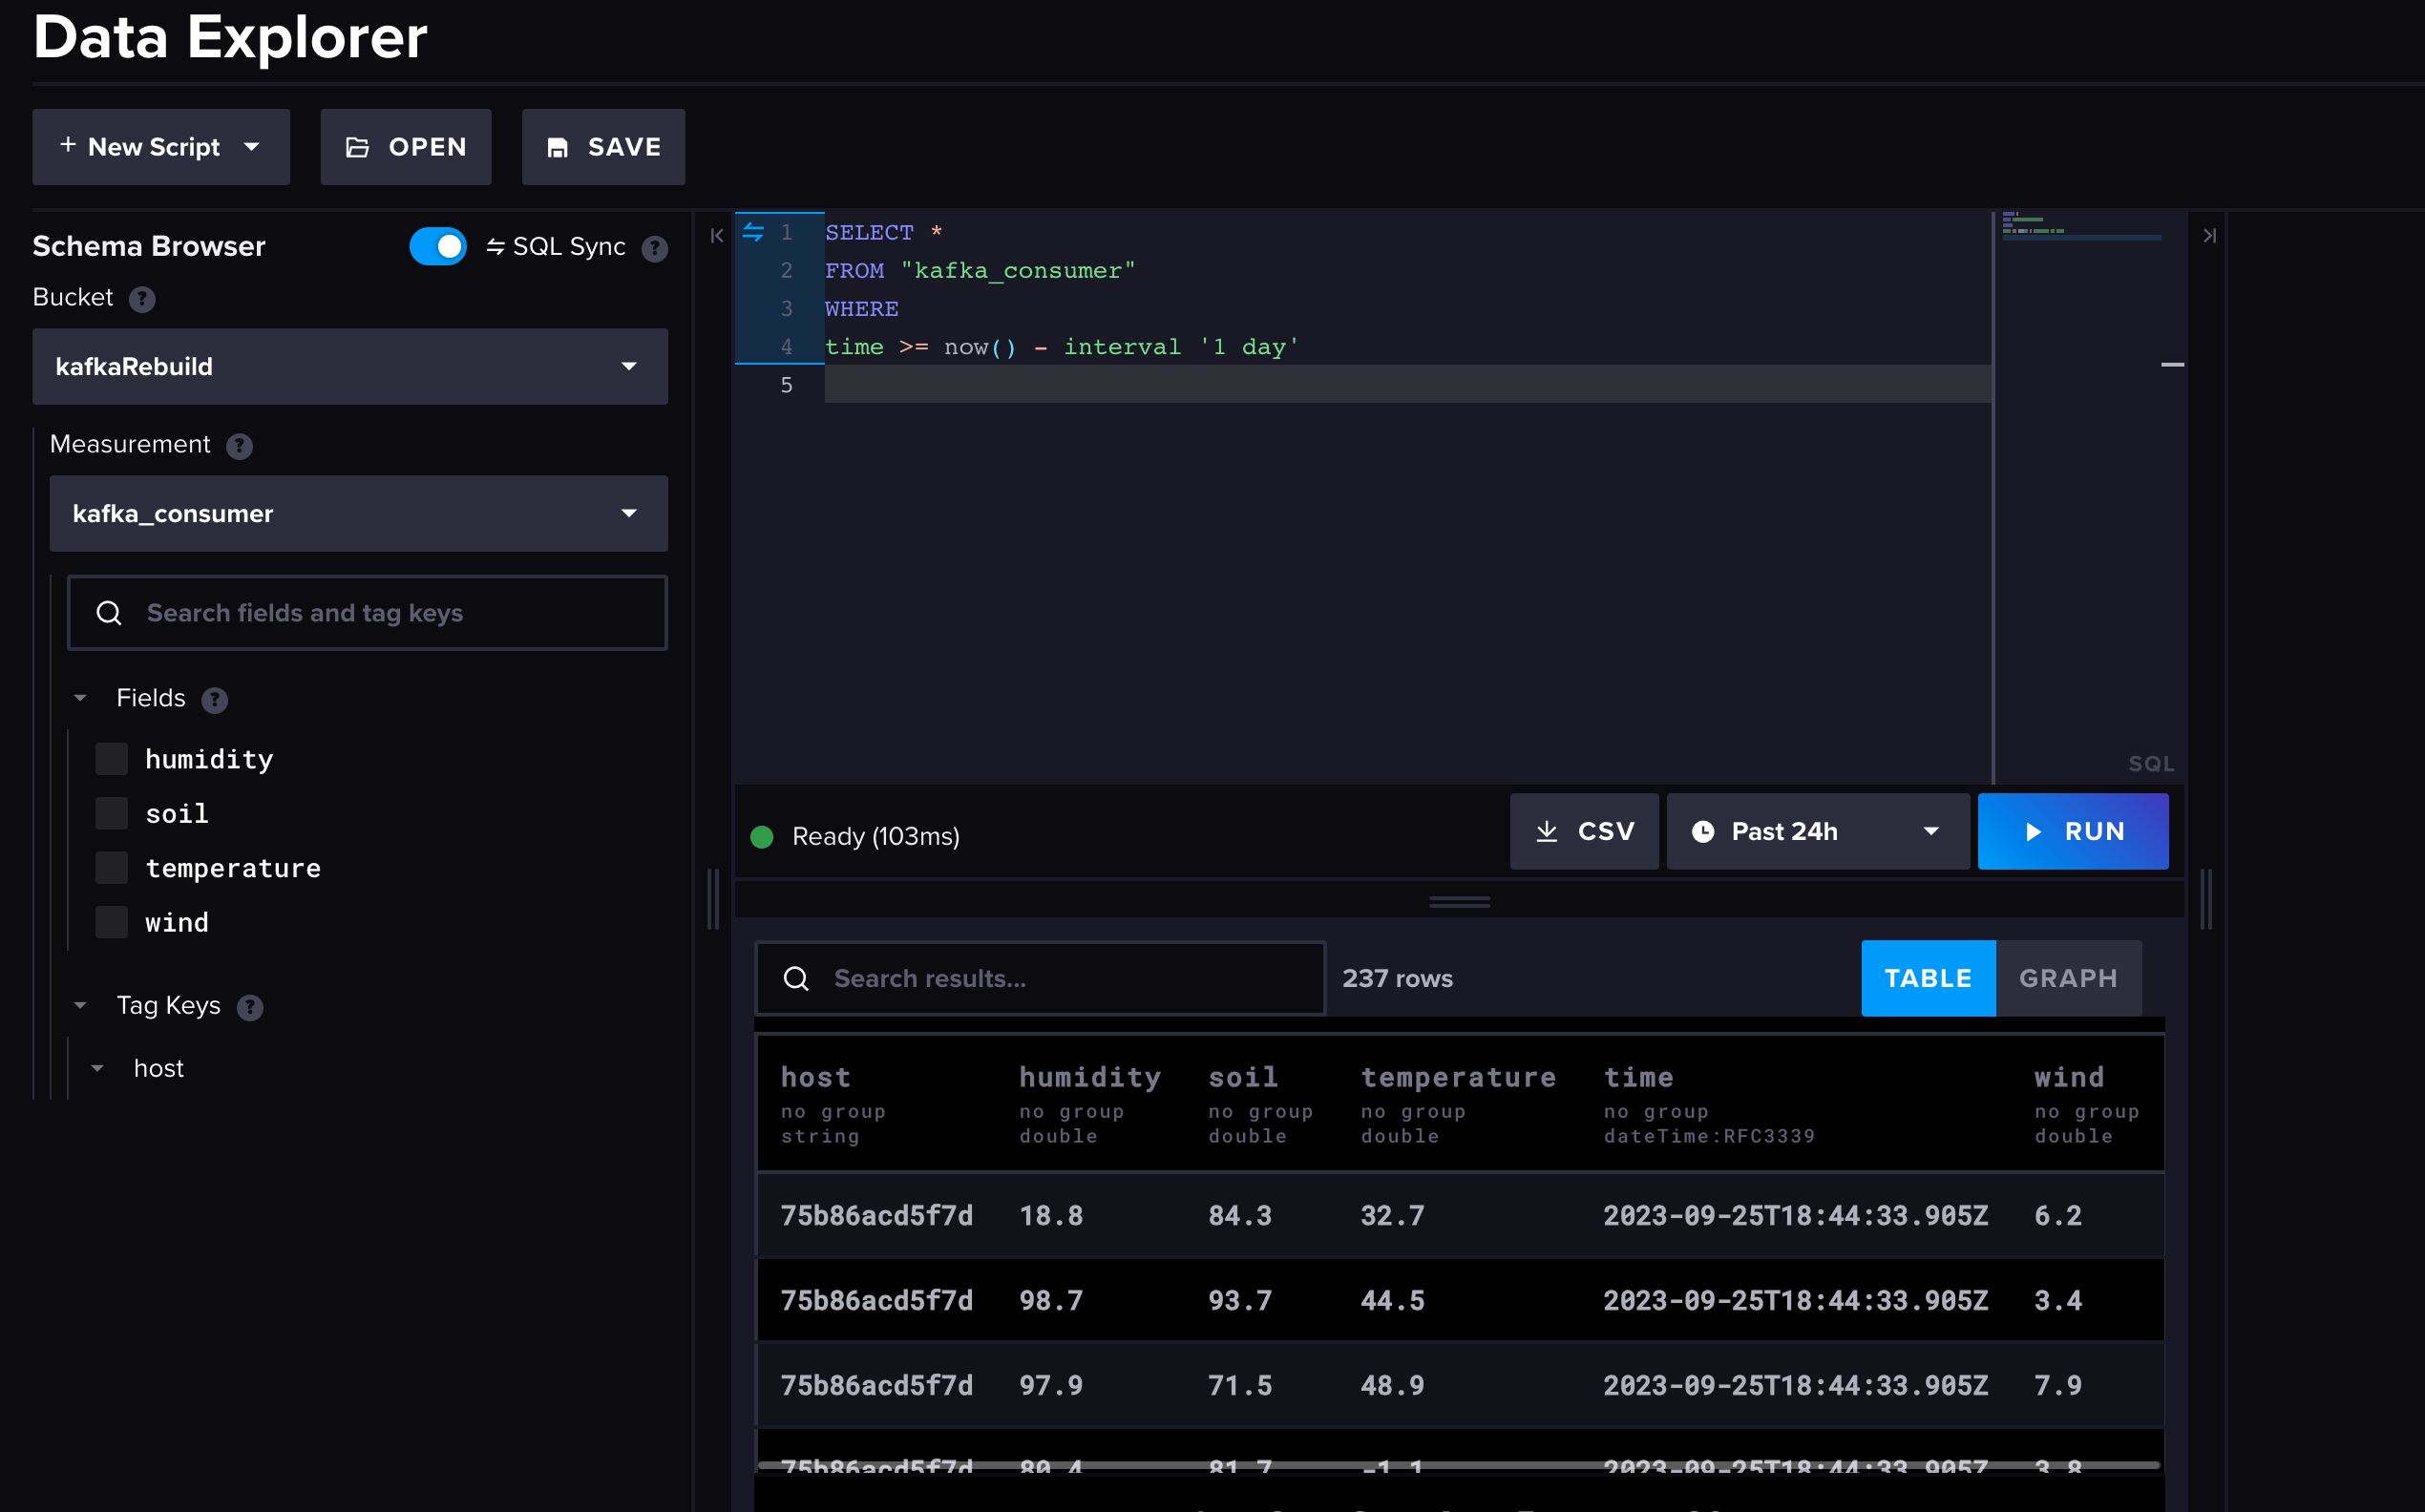
返回到 InfluxDB Cloud Serverless 账户,您可以通过选择左侧图标菜单中的图表图标来访问数据浏览器。选择存储桶和测量项,以及您要查询的时间窗口,然后运行查询。

将您的 Kafka 集群连接到 InfluxDB Cloud Serverless 真的就这么简单。
继续使用时间序列数据
这只是您可以使用 InfluxDB Cloud Serverless 和 Kafka 完成的工作的开始。要继续在我们社区中工作,请查看我们的 社区页面。此页面包含指向我们的 Slack 工作区的链接以及更多帮助您入门的项目。
如果您准备好探索 InfluxDB Cloud Serverless 或我们的其他产品,Cloud Dedicated 或 Clustered,您可以在此处联系我们的销售团队的某个人。
